science
Food Dehydration and Drying
Dehydrate and dry food at home: the science of moisture removal, drying methods compared, building a solar dehydrator, and choosing an electric one.
Most of the food you throw away is rotting because of water. Not because the food is fragile, not because it is old — because the 75-95% of its mass that is water provides a perfect growth medium for every spoilage organism in your kitchen. Remove that water and the same tomato that rots in a week on your counter lasts a year in a jar on a shelf. No refrigeration. No canning. No chemical preservatives. The science is simple and the equipment can be as basic as a screen and sunlight.
1. Introduction and History
Dehydration is the first preservation method humans ever used. Before fermentation, before salt curing, before fire — there was sun-drying. Fish dried on rocks in coastal settlements. Meat cut thin and hung in dry wind. Fruits left on hot stone surfaces. Archaeological evidence places intentional food drying in the Middle East and North Africa at least 12,000 years ago (Nummer, 2002).
Every arid-climate civilization built its food security on drying. Native Americans produced pemmican — dried bison meat pounded with rendered fat and dried berries — that remained edible for years and provided complete nutrition during travel and winter. The Inca developed chuño by freeze-drying potatoes at altitude, exploiting the high-elevation cycle of freezing nights and dry sunny days. Roman legions carried dried fruits and grains that required no preservation infrastructure beyond a dry bag.
The Industrial Revolution introduced mechanical dehydration. The first commercial dehydrator patents appeared in France in the 1790s. During the American Civil War, compressed dehydrated vegetables (called "desiccated vegetables" by troops who were not fans) became standard military rations. Both World Wars drove rapid development of industrial drying technology — spray drying, drum drying, and tunnel drying all emerged from military procurement needs.
Modern home dehydration became practical in the 1970s when affordable electric dehydrators hit the consumer market. Excalibur introduced its horizontal-airflow design in 1973. The technology has not changed fundamentally since — warm air, controlled circulation, time.
The physics are the same whether you are drying fish on a rock in 10,000 BCE or running a nine-tray Excalibur in your kitchen. Move warm, dry air over food. The air absorbs moisture from the food surface. Fresh air replaces saturated air. Repeat until the food cannot support microbial life.
2. Dehydration Science
Two concepts control everything in food drying: water activity and equilibrium moisture content.
Water activity (Aw) is a ratio from 0 to 1.0. Pure water has an Aw of 1.0. Aw measures the availability of water for chemical and biological reactions — not how much water is present, but how much of it microorganisms and enzymes can actually use. The thresholds are well established:
- Aw > 0.95: Most bacteria thrive. Fresh meat, fruits, vegetables.
- Aw 0.85-0.95: Some bacteria (Staphylococcus aureus), most yeasts and molds. Cured meats, aged cheeses.
- Aw 0.60-0.85: Some molds and osmophilic yeasts. Dried fruits, honey, jams.
- Aw < 0.60: No microbial growth. Properly dried foods, crackers, powdered milk.
The target for shelf-stable dehydrated food is Aw below 0.60. At this level, spoilage is impossible without reintroduction of moisture (Labuza, 1980).
Moisture content is the percentage of a food's total weight that is water. Fresh apples are roughly 84% water. Dried apples at 20% moisture content have lost most of that water but may or may not be shelf-stable depending on how tightly the remaining water is bound.
The relationship between moisture content and Aw is not linear and varies by food type. Sugary fruits bind water more tightly than lean vegetables. A dried mango at 15% moisture content may have a lower Aw than a dried carrot at 10% moisture content because the sugars in mango chemically bind water molecules, making them unavailable to microbes.
Equilibrium moisture content (EMC) is the point where a food stops gaining or losing moisture to its environment. Dried food stored in a humid environment will slowly absorb moisture until it reaches equilibrium with that humidity. This is why storage conditions matter as much as drying conditions. Food dried to 8% moisture content will climb back to 15% if stored unsealed in a 70% relative humidity environment.
Enzymatic browning is the other enemy. Even at low Aw, enzymes can cause color changes, off-flavors, and nutrient degradation over time. Pretreatments — blanching, sulfiting, ascorbic acid dips — denature these enzymes before drying. Without pretreatment, many dried foods darken and develop stale flavors within months even though they remain microbiologically safe.
Temperature and airflow are the two levers you control during the drying process. Higher temperature increases the rate of moisture evaporation but can case-harden the food surface — sealing moisture inside and creating a product that appears dry but is not. Lower temperature is gentler but takes longer and increases the window for microbial growth during the early stages of drying. Airflow carries saturated air away from the food surface and replaces it with drier air, maintaining the vapor pressure gradient that drives evaporation.
The ideal setup delivers consistent temperature with sufficient airflow to prevent humidity buildup around the food. Stagnant warm air quickly saturates and stops removing moisture regardless of how hot it is.
3. Drying Methods Compared
Sun drying
The original method. Requires sustained temperatures above 85°F, humidity below 60%, and good air circulation. Effective in arid climates — parts of the American Southwest, Mediterranean, Middle East. Unreliable in humid regions. Exposes food to insects, birds, dust, and contamination. Takes 2-4 days for most fruits. Free to operate but limited by geography and weather. Still widely used for dates, tomatoes, figs, and grapes (raisins) in commercial agriculture.
Solar dehydrator
An engineered improvement on sun drying. Uses a glazed collector panel to heat air and a drying chamber with screened trays. The greenhouse effect in the collector raises air temperature 20-40°F above ambient. Convective airflow (warm air rises, drawing fresh air in through bottom vents) moves air across food without fans or electricity. Protects food from insects and contamination. Achieves 130-150°F in the drying chamber on sunny days (Brenndorfer et al., 1985). Costs $50-150 in materials to build. Detailed build guide in Section 4.
Electric dehydrator
The standard home method. Uses electric heating elements and fans to circulate warm air across stacking trays or sliding shelves. Temperature control from 95°F to 165°F. Consistent performance regardless of weather. Costs $40-400 depending on design and capacity. Two main designs: stackable round trays (Nesco-style) and box-style with horizontal airflow (Excalibur-style). Detailed selection guide in Section 5.
Oven drying
Uses a conventional kitchen oven set to its lowest temperature (typically 170°F, often higher than ideal). Door must be propped open 2-4 inches to allow moisture to escape, which makes temperature control difficult and wastes energy. Works in a pinch but is inefficient. Oven temperature fluctuations can cook rather than dry, particularly at the edges of baking sheets nearest the elements. Not recommended as a primary method. Energy cost is 3-5x higher than a dedicated dehydrator for equivalent output.
Freeze drying
Uses vacuum and subfreezing temperatures to sublimate ice directly from solid to vapor without passing through the liquid phase. Produces the highest-quality dried food — retains color, shape, flavor, and up to 97% of nutritional content. Rehydrates almost perfectly. Commercial freeze-dried food lasts 25+ years in sealed packaging. Home freeze dryers (Harvest Right) cost $2,000-4,000 and are loud, slow (24-36 hours per batch), and energy-intensive. The technology is outstanding but the cost and throughput make it a specialty tool rather than a daily-use method.
Method comparison at a glance
| Method | Cost | Temperature control | Throughput | Weather dependent | Energy cost |
|---|---|---|---|---|---|
| Sun drying | Free | None | Low | Yes | None |
| Solar dehydrator | $50-150 build | Moderate | Medium | Partially | None |
| Electric dehydrator | $40-400 | Precise | Medium-High | No | Low |
| Oven drying | Uses existing oven | Poor | Low | No | High |
| Freeze drying | $2,000-4,000 | Automated | Low | No | Very high |
4. Solar Dehydrator Build
This design is an indirect solar dryer — the sun heats air in a collector panel, and that heated air flows upward through the drying chamber by natural convection. Food never sits in direct sunlight, which preserves color and nutrients. The design handles 15-20 lbs of fresh produce per load.
Materials
- Collector panel: 2x4 lumber frame, 4 ft x 8 ft. One sheet of 6mm twin-wall polycarbonate glazing (clearer and more durable than polyethylene film, better insulator than glass). Interior painted flat black to absorb solar radiation. Aluminum window screen over black-painted plywood base to create an air channel.
- Drying cabinet: 3/4-inch exterior plywood, 2 ft wide x 4 ft tall x 2 ft deep. Five sliding screen trays spaced 4 inches apart. Food-grade stainless steel or fiberglass window screen stretched over 1x2 pine frames for each tray (do not use aluminum screen — it reacts with acidic foods; do not use galvanized — zinc leaches).
- Airflow: 4-inch screened inlet vents at the bottom of the collector panel. 4-inch screened outlet vent at the top of the drying cabinet. The temperature differential between heated air in the collector and ambient air creates a chimney effect that draws fresh air in at the bottom and exhausts humid air at the top.
- Hardware: Exterior wood screws, weather-rated hinges for the cabinet door, food-grade silicone caulk for sealing joints, staple gun for screen attachment.
Build steps
Step 1 — Collector frame. Build a rectangular frame from 2x4 lumber, 4 ft x 8 ft exterior dimensions. Add a center support at the 4 ft mark. Line the bottom with 1/2-inch plywood. Paint the interior surface flat black (high-temperature BBQ paint works). Attach aluminum window screen 2 inches above the plywood base using 1x1 spacer strips along the edges — this creates an air channel beneath the screen.
Step 2 — Glazing. Cut the twin-wall polycarbonate sheet to fit the collector frame. Attach with screws and rubber washers to allow for thermal expansion. Seal edges with silicone caulk. The polycarbonate creates a greenhouse effect — solar radiation passes through, heats the black surface, and the trapped air reaches 130-160°F depending on ambient temperature and sun angle.
Step 3 — Drying cabinet. Build a plywood box, 2 ft wide x 4 ft tall x 2 ft deep. Cut 1/4-inch dado grooves on the interior side walls at 4-inch intervals to accept sliding trays. Add a hinged door on the front for loading and unloading. Drill 4-inch circular vent at the top rear of the cabinet and cover with fine mesh screen to exclude insects while allowing humid air to exhaust.
Step 4 — Tray construction. Build five tray frames from 1x2 pine, sized to slide into the cabinet dado grooves. Stretch food-grade fiberglass screen across each frame and staple on the underside. Sand all edges smooth. Trays must slide freely for loading and rotation.
Step 5 — Assembly. Mount the collector panel at a 30-45 degree angle (adjust for your latitude — steeper angles are better at higher latitudes). Connect the upper end of the collector to the lower inlet of the drying cabinet using a plywood transition piece. Seal all joints. The heated air from the collector enters the cabinet at the bottom, rises through the trays, absorbs moisture from the food, and exits through the top vent.
Step 6 — Inlet vents. Cut two 4-inch screened vents at the low end of the collector panel. These admit fresh ambient air that flows across the black absorber surface and heats before entering the drying cabinet.
Performance notes
On a clear day with ambient temperatures of 85°F+, the collector will push cabinet temperatures to 130-150°F with passive convection providing 1-2 air changes per minute. This is adequate for fruits, vegetables, and herbs. For jerky, where 160°F is required for food safety, a solar dehydrator alone may not reliably hit target temperature — use an electric dehydrator or oven for jerky unless your solar unit consistently exceeds 160°F (verify with a thermometer before trusting it with raw meat).
Overcast days drop collector output significantly. Have a backup plan — either supplemental heat (a 100W incandescent bulb in the collector works) or the ability to move partially dried food to an electric dehydrator to finish.
Orient the collector due south in the Northern Hemisphere. Avoid shading. Elevate the unit off the ground on legs or a table to improve air inlet flow and keep insects and animals away.
5. Electric Dehydrator Selection
Two designs dominate the market. Both work. The differences matter depending on what and how much you plan to dry.
Stackable round trays (Nesco, Presto). Vertical airflow — the fan and heating element sit in the base or lid and push air upward or downward through stacked circular trays. Affordable ($40-80). Expandable by adding trays. Compact storage. The drawback: uneven drying. Trays nearest the heat source dry faster. You must rotate trays periodically. The round shape wastes space with irregularly shaped foods. The center hole in each tray (for airflow) reduces usable surface area. Fine for herbs, fruit leather, and small batches.
Box-style with horizontal airflow (Excalibur, Tribest Sedona). The fan and heating element mount on the rear wall and push air horizontally across rectangular slide-out trays. Even drying across all trays without rotation. Larger capacity (9-tray Excalibur handles 15 sq ft of drying area). Rectangular trays are more efficient for sliced foods. Timer and temperature controls are standard. Costs $150-350. The clear winner for regular use, large batches, and jerky.
What to look for in any dehydrator:
- Adjustable thermostat. Non-negotiable. You need 95°F for herbs, 125°F for vegetables, 135°F for fruits, and 160°F for jerky. A single fixed temperature is a compromise that dries nothing optimally.
- Fan. Must have active airflow. "Convection" dehydrators without fans rely on passive airflow and dry unevenly and slowly.
- Capacity. A 5-tray stackable is fine for occasional use. A 9-tray Excalibur is the minimum for processing a garden harvest. Think about your peak load, not your average load — you will want to dry 20 lbs of tomatoes the same week you have 10 lbs of peppers ready.
- Timer. Useful but not critical. Most drying runs are 8-16 hours. An outlet timer accomplishes the same thing for a dehydrator without a built-in timer.
- Tray material. Polypropylene mesh trays are standard. Stainless steel trays are available for some models and are easier to clean. Solid tray inserts (fruit leather sheets) should be available for the model you choose.
6. Fruits
Fruits are the most forgiving category. High sugar content acts as a natural preservative even if drying is slightly imperfect. Most dried fruits target a pliable, leathery texture — not brittle.
Pretreatment
Enzymatic browning turns cut apples, pears, peaches, and bananas brown within minutes of exposure to air. The enzyme polyphenol oxidase reacts with phenolic compounds in the presence of oxygen. Pretreatment is optional for appearance but strongly recommended for flavor and nutritional retention.
Ascorbic acid dip (preferred). Dissolve 1 teaspoon of pure ascorbic acid powder (vitamin C) in 1 cup of water. Dip sliced fruit for 3-5 minutes. Drain on towels. This is the most effective anti-browning treatment with no flavor impact and the bonus of increasing the vitamin C content of the finished product (Kendall & Sofos, 2012).
Lemon juice dip. Straight lemon juice or a 1:1 lemon juice and water solution. Effective but adds a citrus flavor that not all fruits benefit from. Less effective than pure ascorbic acid because lemon juice contains less vitamin C per volume.
Sulfite dip. Dissolve 1 tablespoon of sodium bisulfite per gallon of water. Soak sliced fruit for 5-10 minutes. The most effective anti-browning treatment and the method used by commercial dried fruit producers. Some people are sensitive to sulfites. Not recommended for anyone with asthma. The sulfur smell dissipates during drying.
Steam blanching. Steam fruit slices for 3-5 minutes. Effective at stopping enzymatic browning and also softens tissue for faster drying. Changes texture — blanched dried fruit is chewier than unblanched. Best for dense fruits like figs and some stone fruits.
Drying process
Slice fruit uniformly at 1/4-inch thickness. Uniformity matters more than exact thickness — uneven pieces mean some finish hours before others, and finished pieces left in the dehydrator will over-dry while thick pieces catch up.
Load trays in a single layer with no overlap. Air must contact all surfaces. Overcrowding dramatically increases drying time and creates pockets of trapped humidity.
Set temperature to 135°F. This is the standard for all fruits. Lower temperatures extend drying time and increase the risk of spoilage during the early stages when moisture content is still high. Higher temperatures risk case hardening — a dry, tough exterior sealing moisture inside.
Drying time varies by fruit and thickness:
- Apples (1/4-inch rings): 8-12 hours
- Bananas (1/4-inch slices): 8-12 hours
- Strawberries (halved): 10-16 hours
- Peaches (1/4-inch slices): 10-14 hours
- Grapes (halved): 18-24 hours
- Blueberries (whole, skin checked): 18-24 hours
- Mangoes (1/4-inch slices): 8-12 hours
Doneness tests
Tear a piece in half. No visible moisture at the tear. No wet or gummy center. The piece should be pliable and leathery — bending without snapping for most fruits. Apples and some fruits can be dried crisper if desired. Berries should rattle when shaken on the tray.
Remove a piece and let it cool for 2-3 minutes before testing. Warm fruit feels softer and moister than it actually is.
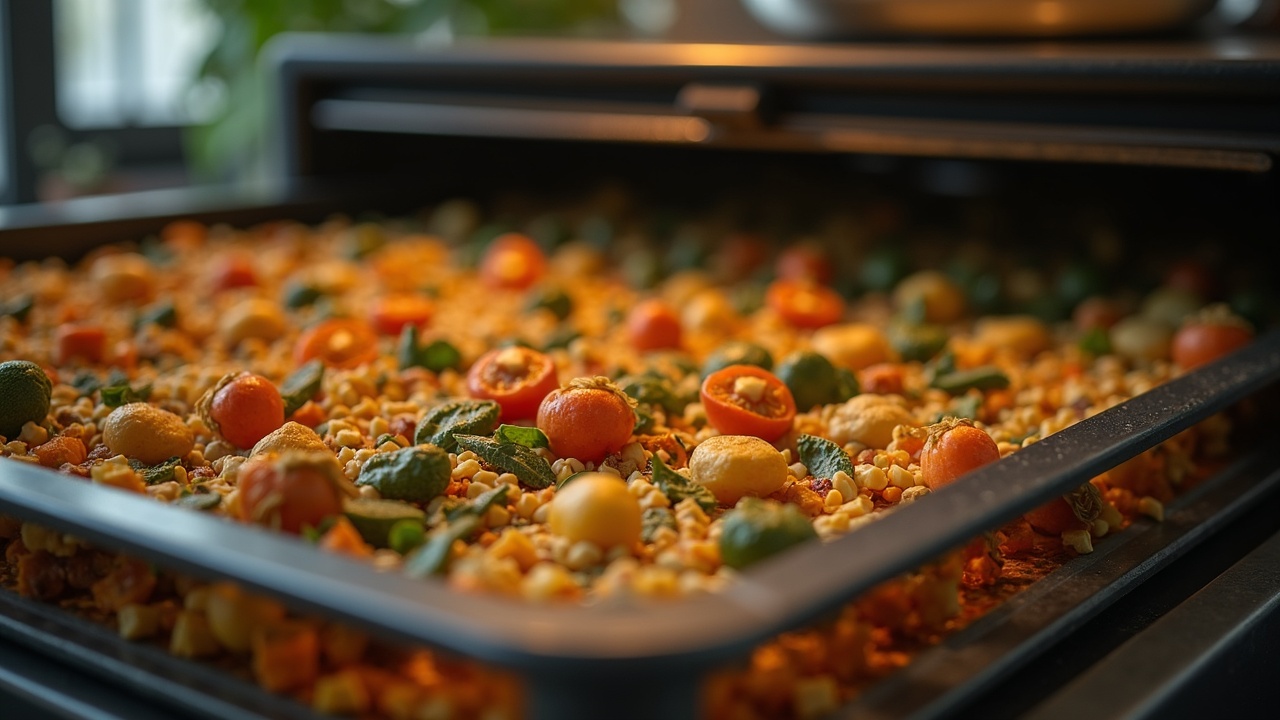
7. Vegetables
Vegetables require more care than fruits. Lower sugar content means less natural preservation. Most vegetables must be blanched before drying.
Blanching
Blanching — brief immersion in boiling water or steam — serves two purposes for vegetables. First, it destroys enzymes that cause flavor, color, and nutritional deterioration during storage. Second, it relaxes cell walls and checks (cracks) the waxy skin surface of many vegetables, allowing moisture to escape more efficiently during drying.
Steam blanching is preferred over water blanching for dehydration. Water blanching leaches water-soluble vitamins and minerals into the blanching water, which is discarded. Steam blanching preserves more nutrients.
Blanching times (steam):
| Vegetable | Blanching time | Prep notes |
|---|---|---|
| Green beans | 4 minutes | Cut to 1-inch pieces |
| Carrots | 3-4 minutes | 1/4-inch slices or shreds |
| Corn | 4-5 minutes | Cut from cob after blanching |
| Peas | 3 minutes | Shell before blanching |
| Broccoli | 3-4 minutes | Cut to small florets |
| Peppers | None needed | Halve or dice, remove seeds |
| Onions | None needed | Slice to 1/4-inch rings |
| Tomatoes | Blanch to loosen skins | Core and halve or slice |
| Zucchini | 3 minutes | 1/4-inch slices |
| Potatoes | 5-6 minutes | 1/4-inch slices or shreds |
Peppers, onions, garlic, and mushrooms do not require blanching. Tomatoes are blanched only to remove skins, not for enzyme deactivation.
Drying process
Set temperature to 125°F for all vegetables. Lower temperature than fruits because vegetables have less sugar and are more prone to case hardening. The additional time at lower temperature results in more thorough, even drying.
Dry until vegetables are brittle or tough depending on type. Snap a green bean — it should break cleanly. A carrot chip should shatter when bent. Corn kernels should be hard. Tomatoes should be leathery and slightly pliable.
Drying time varies widely: 6-12 hours for most sliced vegetables, up to 18 hours for tomato halves.
Conditioning after drying
This step is critical for vegetables and is frequently skipped by beginners. Not all pieces in a batch finish at the same dryness. Some are slightly moister than others. Conditioning equalizes the moisture.
Pack cooled dried vegetables loosely in glass jars — fill about 2/3 full. Seal and store at room temperature. Shake the jars once daily for 7-10 days. The drier pieces absorb excess moisture from the moister pieces. If condensation appears on the jar walls at any point, the batch is not dry enough — return everything to the dehydrator for 2-4 more hours (Andress & Harrison, 2014).
8. Herbs
Herbs are the easiest category and the one where a dehydrator pays for itself fastest. Fresh herbs cost $2-4 per small package at the store. A single basil plant produces more dried herb than you will use in a year.
Temperature
Low temperature is essential. Set the dehydrator to 95-105°F. Herbs contain volatile aromatic compounds — the essential oils that give them flavor and medicinal value. These compounds evaporate at higher temperatures. Drying herbs at 135°F drives off the oils you are trying to preserve. If your dehydrator does not go below 95°F, use the lowest setting and prop the door open slightly to reduce heat.
Preparation
Leafy herbs (basil, mint, oregano, sage, thyme, lemon balm). Harvest in the morning after dew has dried. Rinse and pat dry. You have two options: dry whole stems or strip leaves. Whole stems are easier to load — lay them on trays and strip after drying when the leaves crumble off easily. Stripped leaves dry faster but are harder to manage on trays (use fine mesh inserts or cheesecloth over standard trays).
Woody herbs (rosemary, thyme, savory). Dry on the stem. The woody stems hold their shape and make handling easy. Strip after drying by running your fingers down the stem against the grain — dried leaves pop right off.
Large-leaf herbs (comfrey, borage, mullein). Remove leaves from stems. Lay flat on trays in a single layer. These can take 12-24 hours at 95°F due to their thickness.
Timing
Most culinary herbs dry in 2-6 hours at 95-105°F. Thick-leaved herbs (sage, comfrey) take longer. The herb is done when leaves crumble easily between your fingers but are not powdery (unless you want powder).
Storage note
Whole dried leaves retain flavor and potency far longer than crumbled or powdered herbs. Store as whole leaves and crumble just before use. The intact cell structure protects the essential oils inside. Once you break those cells open, oxidation begins.
9. Jerky
Jerky is the one category where food safety protocol is non-negotiable. Raw meat carries pathogens — Salmonella, E. coli O157:H7, Listeria — that can survive the drying process if the meat never reaches a temperature sufficient to kill them. The USDA is clear on this: meat must reach an internal temperature of 160°F (165°F for poultry) to be considered safe (USDA FSIS, 2011).
The safety problem with traditional jerky methods
Traditional jerky recipes call for marinating raw meat and then drying it at 130-160°F. The problem: as the meat dries, it forms a crust that insulates the interior. Surface temperature may reach 160°F while the interior — now dehydrated and less thermally conductive — stays below the pathogen kill zone. Studies at the University of Wisconsin found that E. coli O157:H7 survived in jerky dried by traditional methods even when dehydrator temperatures were set to 155°F (Harrison & Harrison, 2001).
USDA-recommended protocol
Option 1 — Pre-heat method (recommended). Heat meat strips to 160°F in a marinade or boiling liquid before placing in the dehydrator. Bring marinade to a boil, add meat strips, and maintain boiling for 5 minutes. Transfer hot strips directly to dehydrator trays. Dry at 145-155°F until done. This guarantees pathogen destruction before drying begins.
Option 2 — Post-heat method. Dry marinated raw meat in the dehydrator at 145-155°F until done, then heat finished jerky in a 275°F oven for 10 minutes. Less ideal because any surviving pathogens have had hours to multiply during the drying phase before the heat treatment, though the final heat step does achieve the necessary temperature.
Meat selection
Lean cuts only. Fat does not dry — it goes rancid. Top round, bottom round, eye of round, flank steak, and London broil are all excellent. Trim all visible fat. Partially freeze the meat (1-2 hours in the freezer) to firm it for slicing.
Slice 1/4-inch thick, against the grain for a more tender chew or with the grain for a tougher, more traditional texture. Consistent thickness is essential for even drying.
Seasoning
Wet marinade. Soy sauce, Worcestershire sauce, garlic, black pepper, onion powder, smoked paprika. Combine in a non-reactive container. Submerge meat strips, refrigerate for 4-24 hours. Longer marination means deeper flavor penetration.
Dry cure. Salt (1-2 tsp per pound), black pepper, garlic powder, cure #1 (Prague powder, 1 tsp per 5 lbs — contains 6.25% sodium nitrite, inhibits botulism). Mix dry ingredients, coat strips evenly, stack in a container, refrigerate 12-24 hours. The dry cure produces a firmer, drier texture than wet marinades.
Cure #1 is optional but provides an additional safety margin against Clostridium botulinum, particularly for thicker cuts or lower drying temperatures.
Drying
Following pre-heat treatment, arrange strips on dehydrator trays in a single layer without overlap. Set temperature to 145-155°F. Blot excess moisture from strips before loading — surface moisture slows initial drying.
Drying time: 4-8 hours depending on thickness, fat content, and humidity. Jerky is done when it bends and cracks but does not snap in half. It should show white fibers at the crack point. If it snaps cleanly, it is over-dried (still safe, just tough). If it bends without cracking, it is under-dried.
10. Storage
Drying the food correctly is half the job. Storing it incorrectly gives back every advantage you gained.
Moisture testing
The bend/snap test works for field assessment. For precision, a food-grade moisture meter reads directly. Target final moisture content: 10-20% for fruits (they retain more moisture due to sugar binding), 5-10% for vegetables, 10-15% for jerky.
If you do not have a moisture meter, the conditioning method (Section 7) catches over-moist pieces before they cause problems.
Conditioning
Pack dried food loosely in clean, dry glass jars — about 2/3 full to allow shaking. Seal and store at room temperature for 7-10 days. Shake jars daily to redistribute pieces and expose all surfaces. Monitor for condensation on jar walls. Any condensation means the batch needs more drying time. This step equalizes moisture across pieces of varying thickness and catches borderline batches before they go into long-term storage.
Long-term storage methods
Vacuum sealing. The best option for most home producers. Removes air from the bag, eliminating oxidation (the primary cause of flavor degradation in properly dried foods). Vacuum-sealed dried foods stored in a cool, dark place last 1-5 years depending on the food. Use a quality vacuum sealer with thick bags — cheap bags develop micro-leaks.
Oxygen absorbers. Iron-based packets that chemically absorb oxygen in a sealed container. Use 100cc absorbers for quart jars, 300cc for gallon jars. Place the absorber in the jar, seal immediately with a new canning lid, and the absorber will pull the lid down as it removes oxygen. Do not open and reseal repeatedly — each opening introduces oxygen that the absorber must scavenge, eventually exhausting it.
Mylar bags with oxygen absorbers. The standard for very long-term storage (5-10+ years). Fill a food-grade Mylar bag, add an oxygen absorber, and heat-seal the opening with a clothes iron or hair straightener. The Mylar blocks light and provides an additional moisture barrier beyond the seal. Store sealed bags inside a rigid container (5-gallon bucket, plastic tote) for physical protection.
Glass canning jars with tight lids. Adequate for 6-12 months if stored in a dark location. Not ideal for long-term storage because they admit light (which degrades color and some vitamins) and the seals are not airtight enough for multi-year storage without oxygen absorbers.
Storage conditions
Cool, dark, and dry. Every 10°F increase in storage temperature roughly halves the shelf life of dried foods. A pantry at 60°F is ideal. A garage that hits 100°F in summer will degrade quality rapidly. Avoid storage locations with temperature swings — condensation from temperature cycling reintroduces moisture.
Shelf life reference
| Food | Storage method | Expected shelf life |
|---|---|---|
| Dried fruits | Vacuum sealed, cool/dark | 1-2 years |
| Dried vegetables | Vacuum sealed, cool/dark | 2-3 years |
| Dried herbs | Glass jar, dark | 1-2 years |
| Jerky | Vacuum sealed, cool/dark | 1-2 months (refrigerated: 3-6 months) |
| Dried fruits | Mylar + O2 absorber | 5-10 years |
| Dried vegetables | Mylar + O2 absorber | 8-10 years |
| Freeze-dried foods | Sealed #10 can + O2 absorber | 25-30 years |
Jerky has the shortest shelf life because residual fat oxidizes regardless of packaging method. Refrigeration or freezing is recommended for jerky stored longer than 1-2 months. Lean, well-trimmed jerky with cure #1 lasts longer than fattier preparations.
11. Sources
- Andress, E.L. & Harrison, J.A. (2014). So Easy to Preserve. 6th ed. University of Georgia Cooperative Extension.
- Brenndorfer, B., Kennedy, L., Bateman, C.O., Trim, D.S., Mrema, G.C., & Wereko-Brobby, C. (1985). Solar Dryers: Their Role in Post-Harvest Processing. Commonwealth Science Council.
- Carpenter, K.J. (1986). The History of Scurvy and Vitamin C. Cambridge University Press.
- Harrison, J.A. & Harrison, M.A. (2001). "Fate of Escherichia coli O157:H7, Listeria monocytogenes, and Salmonella Typhimurium during Preparation and Storage of Beef Jerky." Journal of Food Protection, 64(8), 1150-1156.
- Hutkins, R.W. (2006). Microbiology and Technology of Fermented Foods. Blackwell Publishing.
- Kendall, P. & Sofos, J. (2012). "Drying Fruits." Colorado State University Extension, Fact Sheet 9.309.
- Labuza, T.P. (1980). "The Effect of Water Activity on Reaction Kinetics of Food Deterioration." Food Technology, 34(4), 36-41.
- McGovern, P.E., Zhang, J., Tang, J., et al. (2004). "Fermented Beverages of Pre- and Proto-Historic China." Proceedings of the National Academy of Sciences, 101(51), 17593-17598.
- Nummer, B.A. (2002). "Historical Origins of Food Preservation." National Center for Home Food Preservation, University of Georgia.
- USDA Food Safety and Inspection Service. (2011). "Jerky and Food Safety." FSIS Fact Sheet.
Tags: [practical-skills] [beginner]